Introduction
I will compare the Peersonic RPA2 with the combination of a Petterson D240x and a Roland Edirol R-05 recorder. Mainly because I have a lot of experience with the D240x - Edirol combo. Both set-ups are useful when a researcher wants to detect and record the echolocation of bats in the field.
Look and feel
The RPA2 is housed in a plastic box and feels solid. It came with a lanyard attached to the lower right corner. The length of the lanyard is fine, you can wear it around your neck while holding the detector comfortably in your hand.
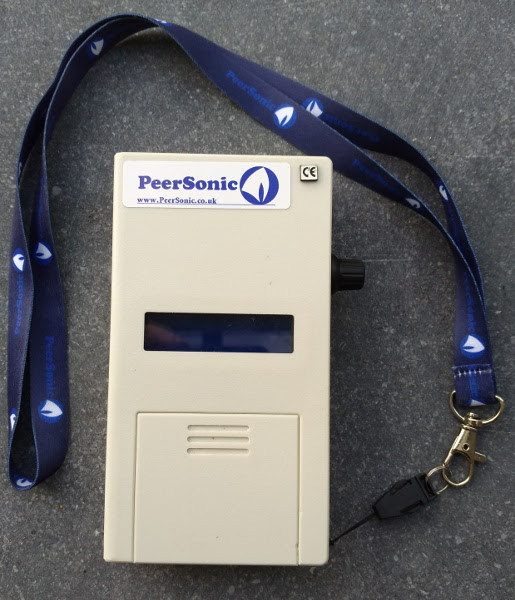 The front has a display and a cover to access the 3 AA batteries. The batteries fit tightly in their compartment. I often use the leverage of a pocket knife to gently get the batteries out. The display has two rows of 16 characters which are easily read in the field. The brightness can be set using the software menu.
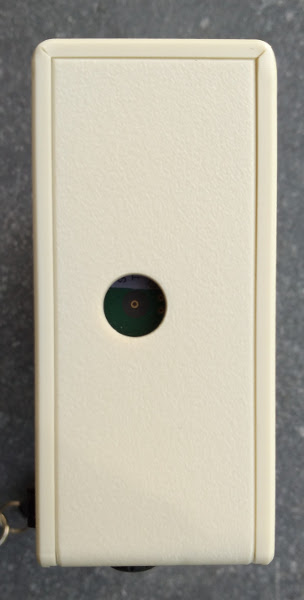 The top side as an opening for the build-in microphone. The back side has a tripod mount. This is useful for static use of the detector or to mount it on a vehicle.
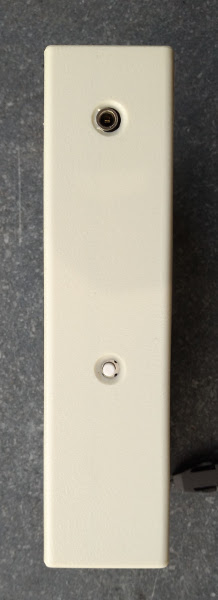 The left side has a 3.5 mm jack output and one push button. The 3.5 mm jack output is used to connect a set of headphones. Unlike the D240x, the RPA2 has no build-in loudspeaker. I find that only an issue in case you want multiple persons to hear the sound at the same time, e.g. when educating people about bats. However, an external loudspeaker is for both detectors a better solution in such occasions. The main function of the push button is to start a manual recording. You can push it with your thumb when holding the detector in your left hand. The button is used in the software menus as well.
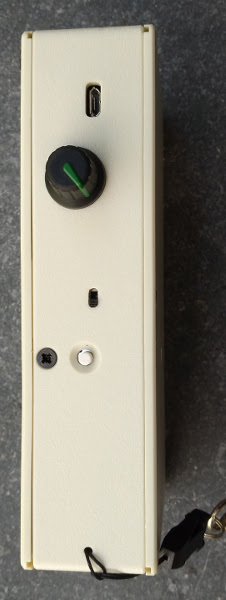 The right side has an on/off switch, a push button, a turn knob and a USB micro B connector. The push button is used to open and enter the software menu. The function of the turn knob depends on the context. It is used to select menu items or update settings. The USB micro B connector allows to download recordings from the RPA2 to a computer or update the software. It also powers the RPA2 and can be used to connect an external battery pack, useful when the detector is used as an autonomous detector.
Usage in the field
Switching the detector on
It takes a few second to get the detector ready. First it will display the current version of the software. Next, the current day and time will be shown and which you can update if needed1. The date and time are saved in the WAV files. Then the RPA3 displays the current voltage of the batteries. It is time to change the batteries when the voltage drops to 3.6 V. When the batteries go too low during a field trip, you get a warning by a clear and sudden change of the sound. The RPA2 will shut down shortly thereafter. Replace with fresh batteries, turn back on an you are good to go again. The detector is operational when the voltage is replaced by the default display which has three elements: current peak frequency, current sound levels and current time.
Listening for bats
The RPA2 has three listening modes: heterodyne, frequency division and peak detect. The mode is selected in the menu. In heterodyne mode the mixing frequency is selected by the turn knob. The bandwidth feels more narrow than that of a D240x. Hence you are more likely to miss e.g. serotines or noctules with a mixing frequency tuned for pipistrelles and myotis bats.
Frequency division has the benefit that it change the entire spectrum by dividing the frequency by a certain factor. This factor is set by the turn knob and ranges from 1 to 20. The sound is quite different from the sound of a heterodyne detector. It will take some time adjusting to that. If you know how a bat sounds on a heterodyne detector, then you will recognize it on a frequency division detector as well. Discriminating species will be harder, but why use frequency division if you have recordings?
The third option is the experimental peak detect method, which I personally find more of a gimmick. The detector will generate a synthetic sound related to the currently detected peak frequency. It is intended to give a stronger detect sound. The loss of information is in my opinion too much to be useful. At least I can no longer tell if the sound originated from a bat or something else (cricket, passing car, clothing, …). A better option might be to couple the detected peak frequency to the heterodyne mixing frequency.
I prefer the frequency division mode with factor around 18. This allows me the distinct bat sounds in the field from non bat sound so I can trigger the recordings efficiently. Examining a recording is quit time consuming, therefore you can save a lot of time by knowing in the field when not to trigger a recording. But of course better safe than sound: in case of doubt, trigger a recording.
Making a recording
The RPA2 has an automatic and a manual mode for recording. The automatic mode will be discussed in an other blog post. A manual recording is triggered by pressing the left button. A full spectrum recording (up to 192 kHz with a 384 kHz sampling rate) will start and stop automatically. The recordings stops when the minimal recording time has elapsed and the left button is released. The minimal recording time is set in the menu in steps of 5 seconds.
Each recording gets a file name based on 3 components: 1) a single letter indicating the detector, 2) 3 digits indicating the peak frequency detected in the recording and 3) 3 letters indicating the order of the recording2. When the files are sorted on file name, the recordings are sorted by peak frequency which is handy if you need to check a large number of files. You can place the sequence before the peak frequency but I recommend to sort the files on their time stamp.
The recordings are saved as 16 bit WAV files on the internal 8 GB SD card. That allows around 1900 records of 5 seconds (4.2 MB). Larger SD cards are available when required.
The RPA2 is clearly a winner in terms of user friendliness when compared with a D240x set-up. Workflow for the RPA2:
- Listens for bats.
- Push the left button as soon as you hear a bat.
- Done.
The workflow for the D240x + Edirol is quite elaborate:
- Listens for bats.
- Push the trigger on the D240x when you think you have the recording in the buffer (the last 0.1, 1.7 or 3.4 s). The D240x will now switch into time-expansion play-back mode which play an endless loop of the buffer 10 times slower.
- Start recording the output of the D240x with the Edirol.
- Stop the recording when you have the entire buffer, so 1, 17 or 34 s.
- Put the D240x back into recording mode.
- Done.
| Task | RPA2 | D240x |
|---|---|---|
| Buttons to push | 1 | 5 |
| Recorded time (s) | 5 | 1.7 |
| Minimal time between the start of two recordings (s) | 5 | 19 |
At home
To download the recordings to a computer, you connect the RPA2 with a USB cable to a computer. The RPA2 will be recognised as an external storage device and you can use a file explorer to copy the file from the RPA2 to the computer. Note that the files on the RPA2 are read-only and can’t be deleted from the computer. File deletions must be done from within the menu of the RPA2.
Here the Edirol is easier. Take the SD card from the Edirol and plug it in the computer. Do what ever you like to do with the file on the SD card.